AquaMon® Installation Guide for Installation Guide for LeafMon© Crop Management System |
Fully Integrated System for Continuous Monitoring of Crop Water Stress |
|
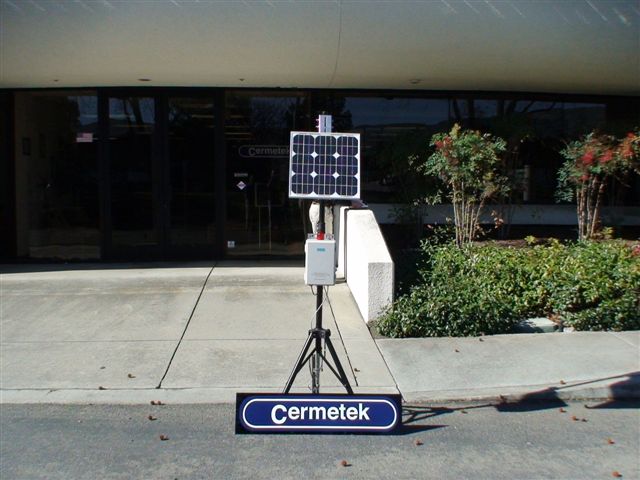
*Note: the image above is for illustration purposes only and does NOT include all options available for all variants of the CHA50006 product family. INTRODUCTION This document contains installation instructions for the Cermetek CHA50006XBSx,LeafMon Crop Management System containing a Cellular Radio, Solar Panel, LeafMon Instrument and various ancillary sensors. The CHA50006XBSx Crop Management System permits monitoring of ambient temperature, relative humidity, wind velocity, leaf temperature and photosynthetically active radiation (PAR). In line irrigation water pressure and/or soil moisture is also monitored. The Cermetek RSVP (Remote Sensor Viewing Platform) internet based software uses these measured parameters in the calculation of the monitored plant's Crop Water Stress Index. The CHA50006XBSx is powered by a solar panel via a rechargeable sealed battery. Additionally, RSVP permits the user to establish maximum and minimum Alarm Set Point Limits. RSVP automatically trigger activities should the monitored parameter(s) violate the user specified Alarm Set Point; Limits. An example of usage of this feature would be sending alarm messages by email and/or TXT to cell phones when monitored temperature drops below a minimum value (such as; 32°F). CHA50006XBSx MONITORING NETWORK with RF CELL RADIO CONFIGURATION
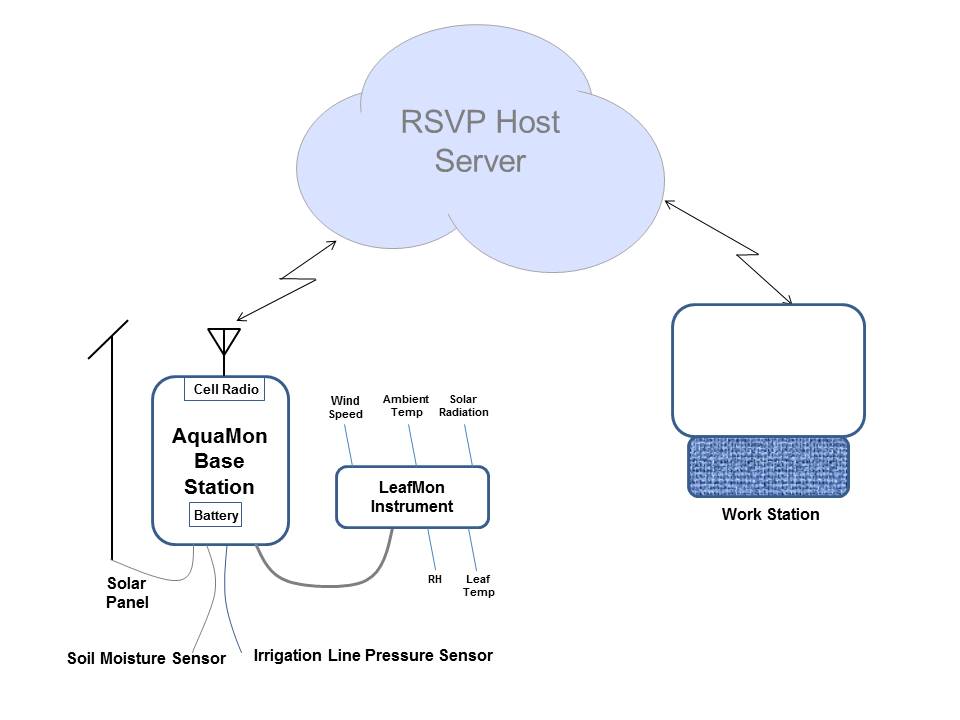
Figure 1. Block Diagram of CHA50006XBSx LeafMon Crop Monitoring System THEORY OF OPERATIONReferring to the block diagram in Figure 1, the CHA50006XBSx System is self-contained and consists of the three basic sub-systems:
Specific equipment supplied by Cermetek and included as part of the AquaMon Controller Base Station:
Cermetek supplies the LeafMon Instrument as a component of the Cermetek LeafMon Crop Monitoring System, model number CHA50006XBSx. The LeafMon instrument Connects to the AquaMon Base Station through a provided RS485 cable. Items supplied by Cermetek to allow access to the Internet and to RSVP:
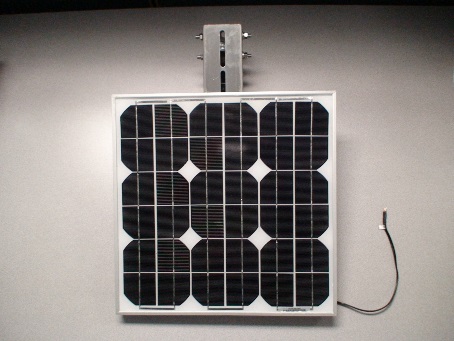
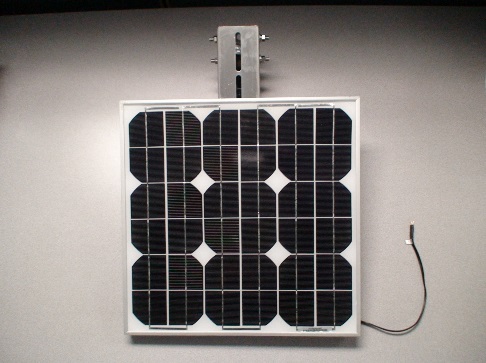
Figure 2A. Solar Panel w/Cable.
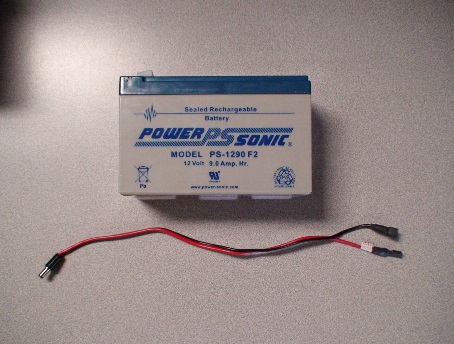
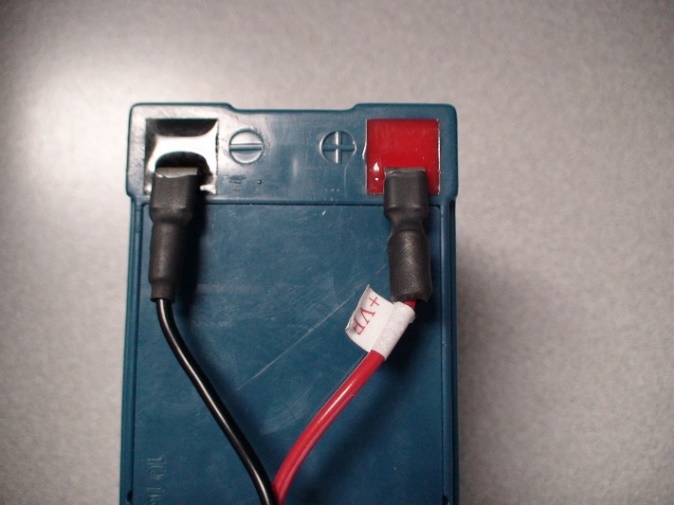
Figure 2B. Battery and Cable.
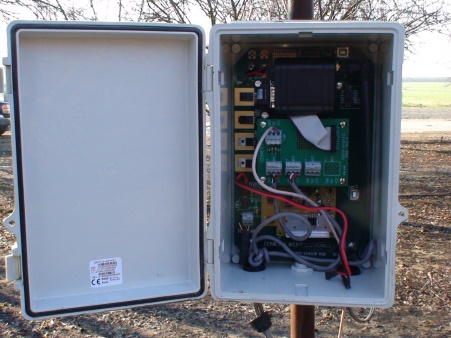
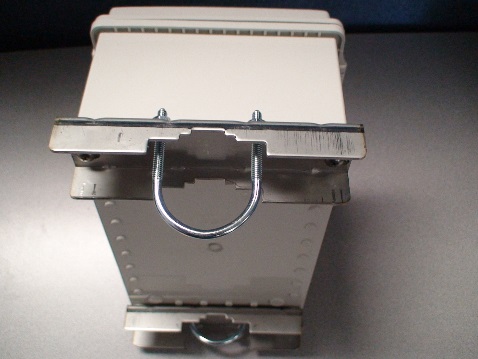
Figure 2C. AquaMon Base Station.
Figure 2D. Soil Moisture Sensor.
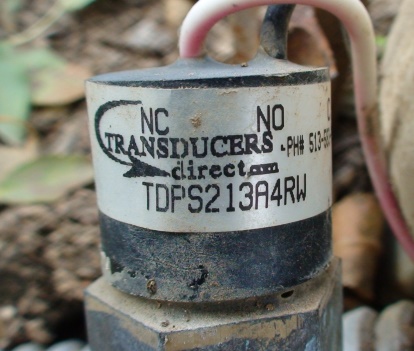
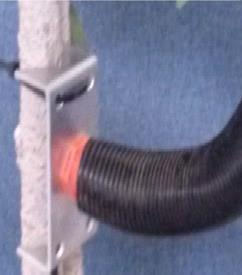
Figure 2E. Pressure Sensor.
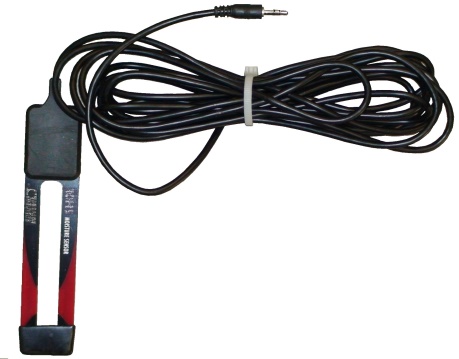
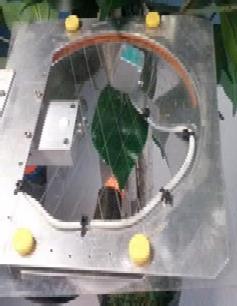
Figure 2F. LeafMon Instrument. Figure 2. Images of CHA50006XBSx components supplied by Cermetek Microelectronics. As only one of these sensors is needed, Cermetek will supply the sensor of the End User's choice (for an additional charge). Alternatively the grower can supply the sensor. RECOMMENDATION Cermetek recommends that the End User contact Cermetek Microelectronics PRIOR to purchasing and/or installing any sensors to verify compatibility with the LeafMon Crop Monitoring System. If the End User decides against utilizing an ancillary moisture or pressure sensor (as described above) to automatically monitor watering events, the RSVP software allows the End User to manually specify the time and duration of watering events. The irrigation time can be set by selecting the LeafMon Dashboard display, clicking on the graph, and then entering the date and time of the last irrigation in the provided box. Although NOT optimum, manual entry of watering events is an acceptable alternative to active monitoring of watering events. End User SUPPLIED equipment includes:
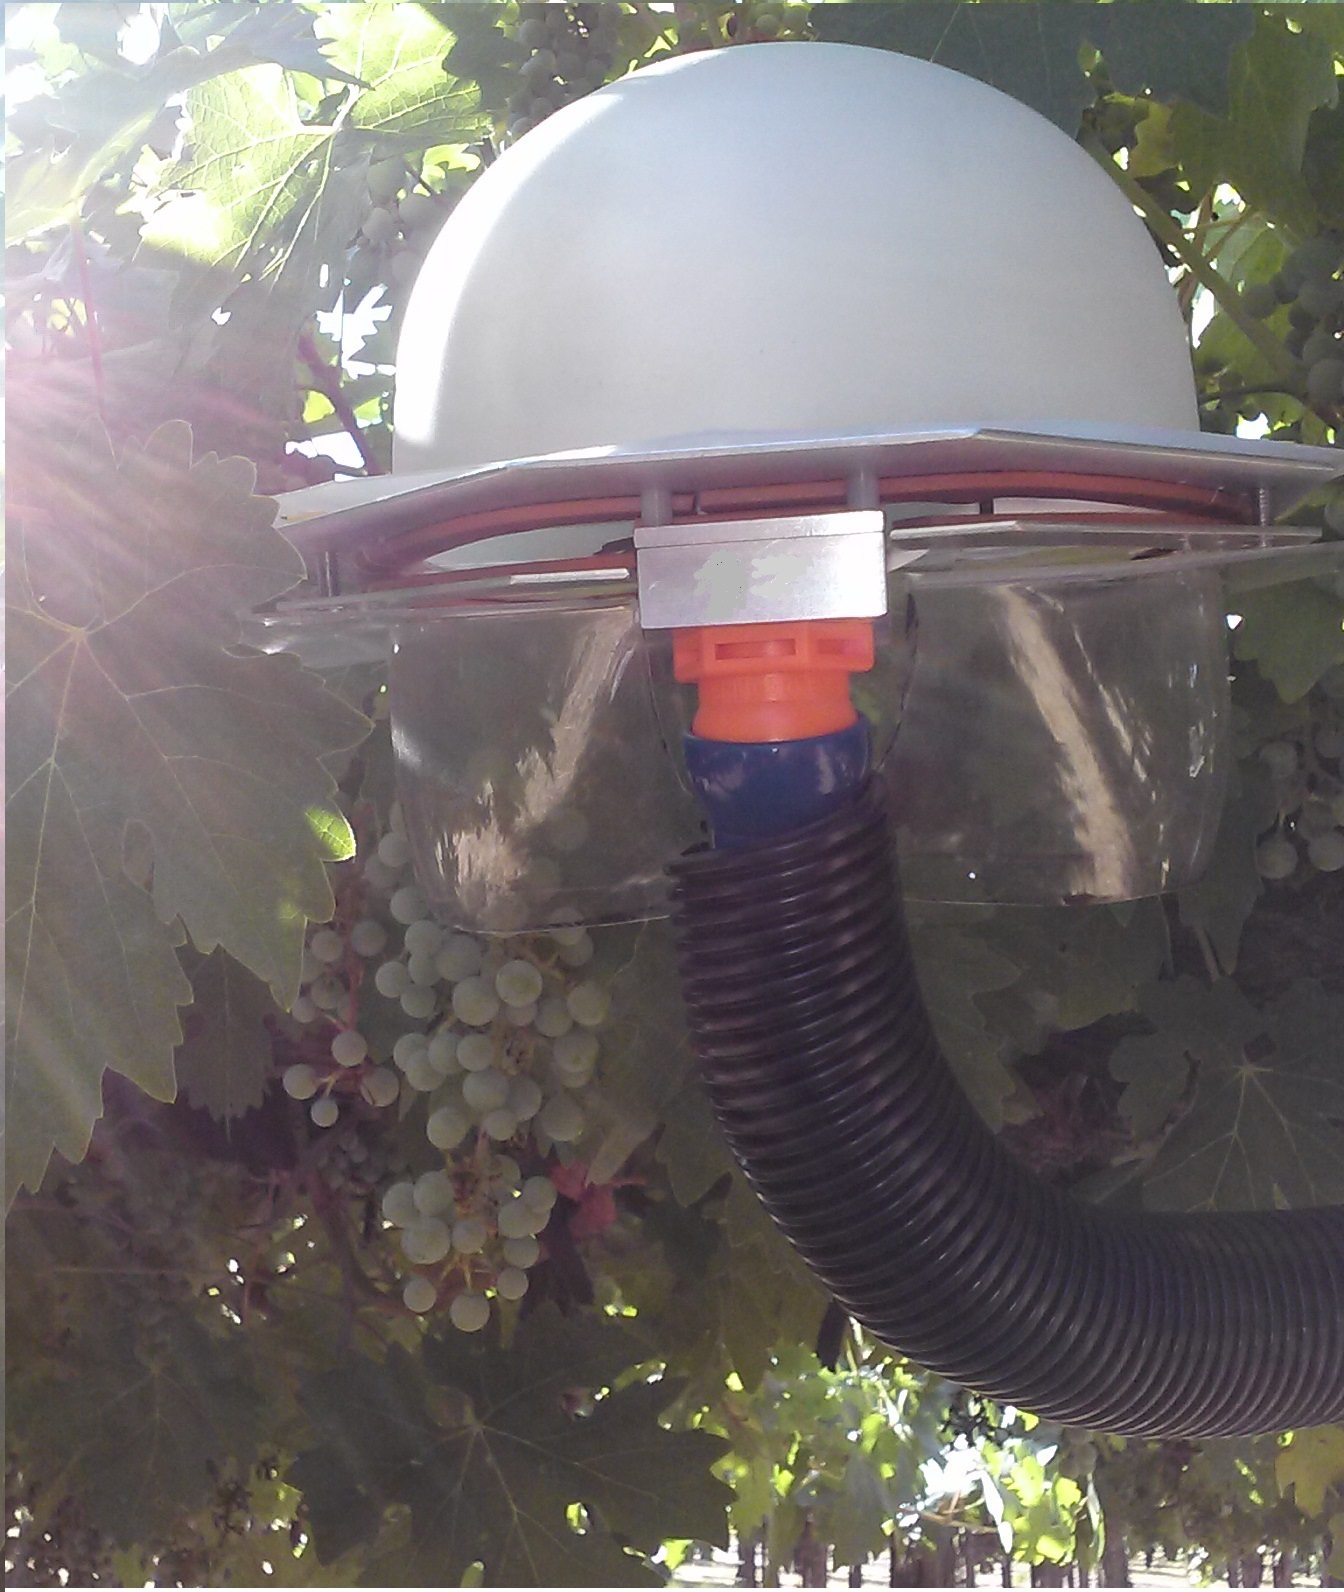
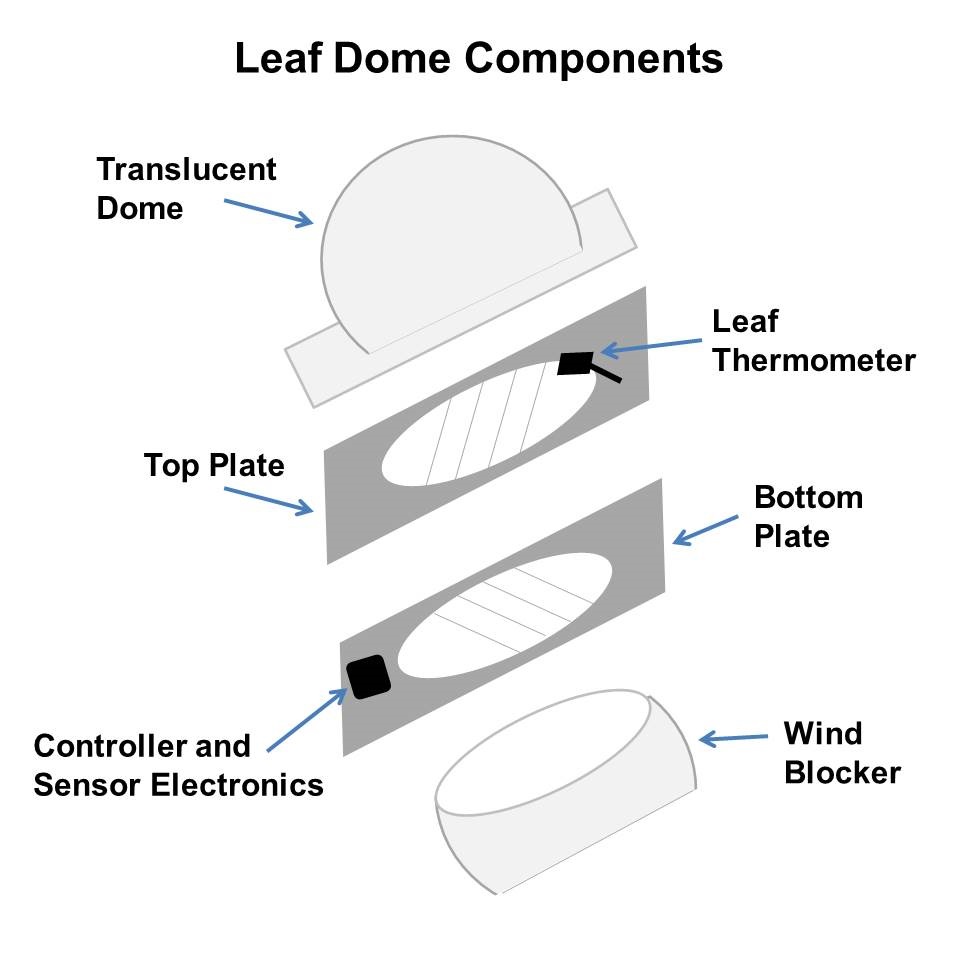
The CHA50006XBSx AquaMon Base Station serves the following purposes: Functionally, the AquaMon Base Station serves as a gateway to the Internet. It collects data from LeafMon and other attached sensors, and moves the data to Cermetek's RSVP Web server. Data (i.e., monitored parameter values) collected from LeafMon and other sensors is cached in the AquaMon Base Station and periodically (the period is user definable but no more often than once per two minutes) transmitted via the Cellar module to the Internet. Besides sensor data, AquaMon Base Station Health Status information is transmitted allowing assessment of such items as remaining battery charge and solar panel charging performance. AquaMon Base Station Battery and Solar Panel Operation: The supplied battery powers the AquaMon Base Station. The Solar Panel charges the battery during the daylight hours. This architecture provides continuous and uninterrupted power to the AquaMon Base Station as the output power of the Solar Panel varies throughout the day and, of course, ceases during evening hours. The system installation and customer use can affect battery life. The solar panel must be aligned to receive the maximum amount of daylight possible. If placed in or around the plant the grower must insure that foliage does not shade the solar panel and limit its effectiveness. The biggest consumer of power in the AquaMon system is the cellular radio. The more frequent the data reporting period the more power that is used. Cermetek recommends reporting data no more frequently than every 15 minutes. LeafMon Instrument Operation: The LeafMon System determines the plant's transpiration efficiency using multiple environmental sensors and a complex set of CWSI calculations. The LeafMon sensor suite is contained in an odd looking instrument with a bulbous head, long neck, and one metal foot. While the LeafMon Instrument may look like some robotic leach - or an escapee from a Sci-Fi movie - it is, in reality, a sophisticated scientific instrument capable of determining the level of water stress being experienced by a plant. Refer to Cermetek Microelectronics document 650-5321, LeafMon User Manual, for more details. RSVP Web Host: The CHA50006XBSx Crop Monitoring System relies on the RSVP web server to support all system functions. Everything from the collection and display of sensor data, establishing and monitoring Alarm Limits, and calculation of the Crop Water Stress Index is performed by the RSVP software running on the web server. A subscription to Cermetek's Web Based Data Hosting Services is required for access to internet related services. Environmental Sensor Data: Crop Water Stress Index (CWSI) calculations require regular data collection from plant and environmental sensors. Referring to the expanded view of the LeafMon Dome in Figure 3, the sensor suite resides under the LeafMon leaf dome. It measures ambient temperature, leaf temperature, solar radiation (PAR), relative humidity and wind speed.
Figure 3: Expanded view illustrating LeafMon sub-components. One key parameter needed for accurate CWSI calculations does not originate from the leaf dome instrumentation suite, accurate irrigation cycle times. The CWSI calculations need the time of the last application of water to calculate reference values. LeafMon will automatically determine the; irrigation cycles by monitoring either pressure sensors inserted into the irrigation line or by monitoring soil moisture sensors inserted in the ground; beneath the plant being measured. The sensors are connected to the AquaMon Base Station and RSVP receives the appropriate data from the AquaMon Base Station. If soil moisture or irrigation line pressure sensors cannot be employed, manual entry of irrigation cycles can be made via the RSVP software platform. The irrigation time can be set by selecting the LeafMon Dashboard display, clicking on the graph, and then entering the date and time of the last irrigation in the provided box. Caution If inaccurate irrigation times are entered into RSVP, the resulting CWSI calculations may also be inaccurate. Data Transfer: A microcontroller located within the leaf dome gathers the environmental sensor data. The AquaMon Base Station retrieves this data per the schedule defined by the End User (as entered into RSVP in the Node Setup menu item SAMPLE PERIOD) from the microcontroller over a wired RS485 serial connection. The AquaMon Base Station then transmits the aggregated sensor data to the Cermetek secure web server via the embedded RF Cellular link per the schedule defined by the End User (as entered into RSVP in the Node Setup menu item UPLOAD PERIOD). Any data collected from in ground soil moisture or irrigation in line pressure sensors connected directly to the AquaMon Base Station are also sent to the Cermetek secure web server. Refer to Cermetek Microelectronics document 607-1101, RSVP Software User's Introduction Guide, for a more detailed discussion of RSVP Node Setup parameters. CWSI Calculations: The RSVP software running on the secure Cermetek web server incorporates the incoming data from the LeafMon environmental sensors and any other sensors connected to the AquaMon Base Station into its active database. RSVP then calculates the CWSI value and adds the CWSI value to the database. RSVP Software: The RSVP web based application can be accessed from any hardware platform running a commercially available browser. Among the browsers; supported by the RSVP software are such widely used products as: Internet Explorer?, Safari?, FireFox?, Mozilla?, Opera?, and Google Chrome?. RSVP permits remote access to the sensors and their associated archived data from any Internet enabled PC or MAC hardware platform (including Desktop and Laptop devices) as well as Internet enabled Cell Phones, iPads?, etc. Access to the CHA50006XBSx RSVP account is via the Cermetek web page located at www.aquamonrsvp.com. Access to RSVP requires a Cermetek supplied Login USERNAME and PASSWORD. Cermetek allows the user to replace the Cermetek assigned Password with a Password of their own choosing through RSVP. Cermetek creates the initial RSVP account at the time of the system purchase. Archived Data. Cermetek's Web Based Data Hosting Services automatically archives user sensor data. Access to all user data is controlled via a user defined password. Additionally, a backup copy of user data is maintained by Cermetek for a minimum period of 3 years. For additional data retention services, please contact Sales at Cermetek for more detailed information and pricing. Archived data can be retrieved using Cermetek's RSVP software. Retrieved data is downloaded in XLS (i.e., MS EXCEL?) format and may be stored locally (at the user's discretion). A subscription to Cermetek's Web Based Data Hosting Services is required for access to internet related services. LIST OF DOCUMENTS and MATERIALS PROVIDED BY CERMETEK MICROELECTRONICSThe; following documents are provided by Cermetek Microelectronics:
The; following products, services and materials are provided by Cermetek; Microelectronics:
LIST OF MATERIALS PROVIDED EITHER BY CERMETEK MICROELECTRONICS or THE END USERThe following products, services and materials are strongly recommended. They can be supplied by Cermetek (at additional cost) or by the End User:
LIST OF MATERIALS TO BE PROVIDED BY THE END USERThe following materials are to be provided by the End User:
AQUAMON BASE STATION INSTALLATION The CHA50006XBSx AquaMon Base Station with Cellular Radio communicates with the Internet via an established cellular network and collects data from both the LeafMon Instrument and the ancillary sensors. See Figure 2 for images of the various hardware components that comprise the CHA50006XBSx LeafMon Crop Monitoring System.Installation of the AquaMon Base Station requires physical connection of the Base Station, the Solar Panel and the LeafMon Instrument to the End User SUPPLIED standard (or pole). Cermetek supplies hardware mounting brackets. The following electrical components MUST be installed by the End User for optimum performance of the LeafMon Crop Monitoring System:
No additional electrical connections are required for full functionality. Internet connection occurs automatically on application of power to the AquaMon Base Station. No external configuration is required. CAUTION The CHA50006XBSx AquaMon Base Station is supplied with the Battery and Charging Circuitry pre-wired to all internal connections EXCLUDING CONNECTION OF THE BATTERY AND THE SOLAR PANEL. YOUR SYSTEM SHIPPED FROM THE FACTORY WITH THE BATTERY DISCONNECTED FOR YOUR SAFETY. HARDWARE INSTALLATION PROCEDURE Follow the step-by-step procedure outlined below to attach the Base Station, Solar Panel, LeafMon and ancillary sensors. Step 1: Install the; USER SUPPLIED standard (pole) to which the AquaMon Base Station and the Solar Panel will attach per the instructions provided by the standard manufacturer. Anchor the standard is securely in the ground. A minimum depth of 2 feet is recommended. See Figures 5A-5L for; images of typical installations. CAUTION Step 2: Mount the Solar Panel to the standard (pole) above the anticipated placement of the AquaMon Base Station enclosure using the attached hardware. Actual positioning will vary depending on standard (pole) dimensions and location. See Figure 5B. INSTALLATION NOTE
SOLAR PANEL ANGLE ADJUSTMENT EXAMPLE The Fresno, CA Central Valley area is located at latitude 37 Degrees. Therefore, a Solar Panel installed in the Fresno, CA Central Valley area would have a Solar Panel elevation angle of approximately 37 Degrees. Step 3: Attach the AquaMon Base Station enclosure to the standard (pole) approximately 3 to 5 feet off the ground. See Figure 5A.
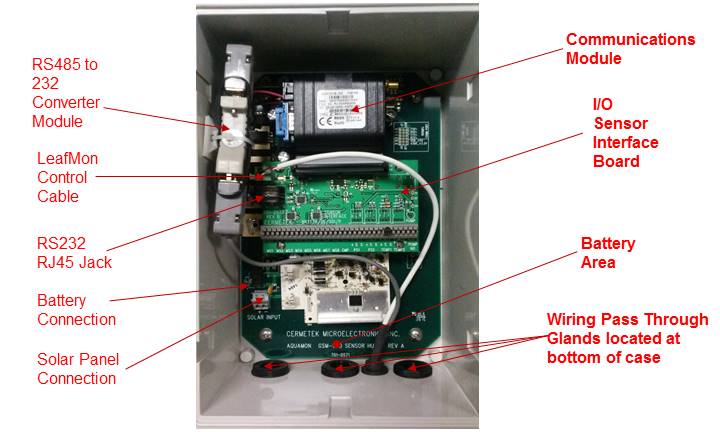
Figure; 4: Internal circuitry of the CHA50006XBSx AquaMon Base Station. This image identifies critical sub-systems and electrical connection points. Exact locations may vary depending on the specific system variant.
DO NOT electrically connect the Battery or the Solar Panel to the Base Station until the LeafMon and ancillary sensors have been connected to the appropriate Sensor I/O Terminal Blocks. Failure to follow this precaution may cause damage to the Sensor I/O Board and/or may damage the Base Station Mother Board.
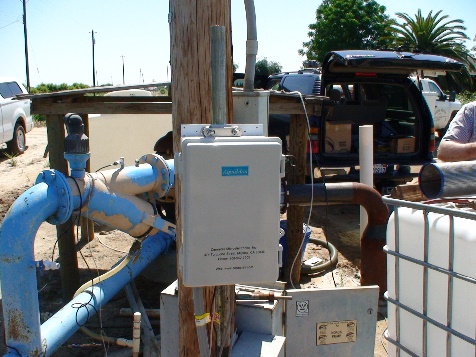
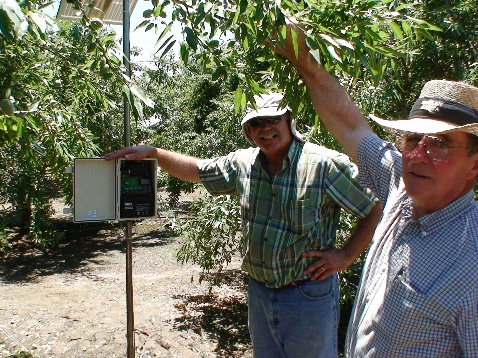
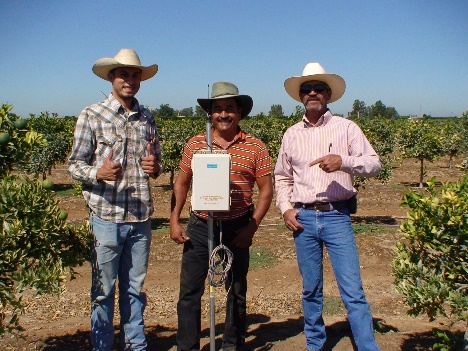
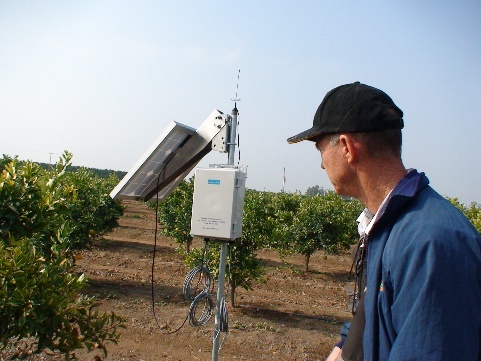
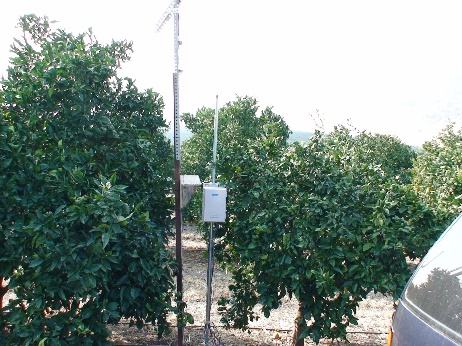
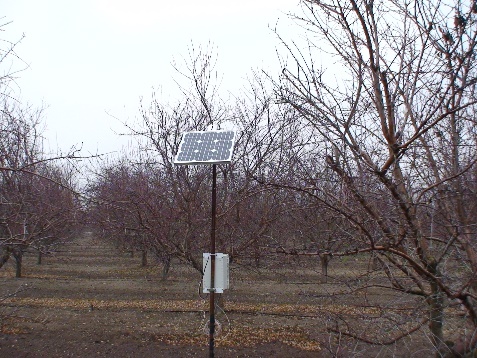
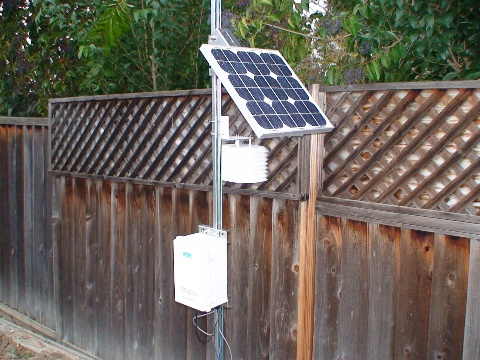
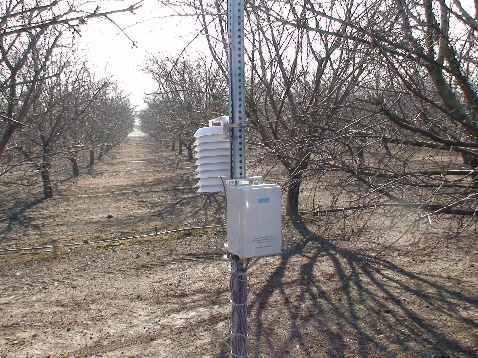
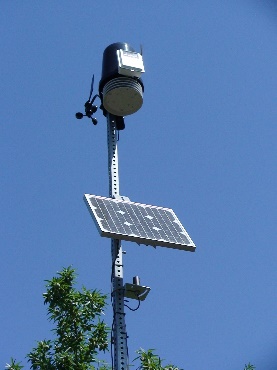
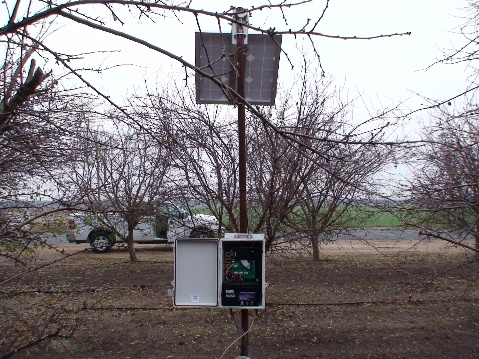
Figures 5A-5L. Images of field installation sites. Note that installations vary to accommodate unique requirements present at each location. LEAFMON INSTALLATION PROCEDURE Installing the LeafMon Instrument does not require any specialized tools or training but it does require attention to detail. Care must be taken to insure that the leaf installed in the leaf dome is under no physical stress. INSTALLATION WARNING Minimizing leaf and stem stress is critical. Failure to do so during the installation process could inhibit leaf growth and maturation thereby adversely affecting CWSI calculations.
LeafMon Installation begins by selecting a suitable leaf, then installing that leaf into the leaf dome, and attaching the LeafMon Instrument to a tree branch or supporting structure. The; installation sequence is described below. Step 4: Selecting the Leaf. The LeafMon instrument monitors one leaf on one plant. To achieve the most accurate Crop Water Stress Index measurements the selected leaf must meet the following criteria:
NOTE Failure to meet the leaf selection criteria will result in inhibited leaf growth and will adversely affecting CWSI calculations.
Step 5: Attach LeafMon to a Branch. The bracket on the flexible arm ties the LeafMon assembly to the trunk or a branch of the tree. Securely fasten the bracket to the tree using the provided tie straps. The entire LeafMon assembly must move with the branch to which it is attached to avoid strain on the installed leaf or its stem. Once secured to the plant, adjust the flexible arm to put the leaf dome in position to accept the selected leaf.
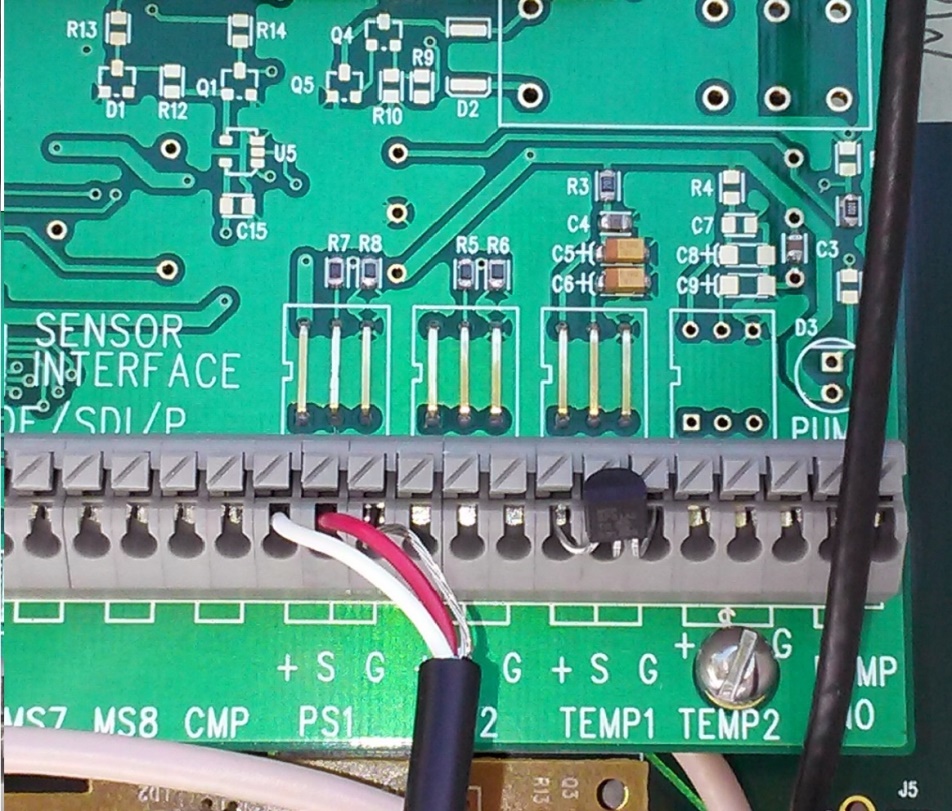
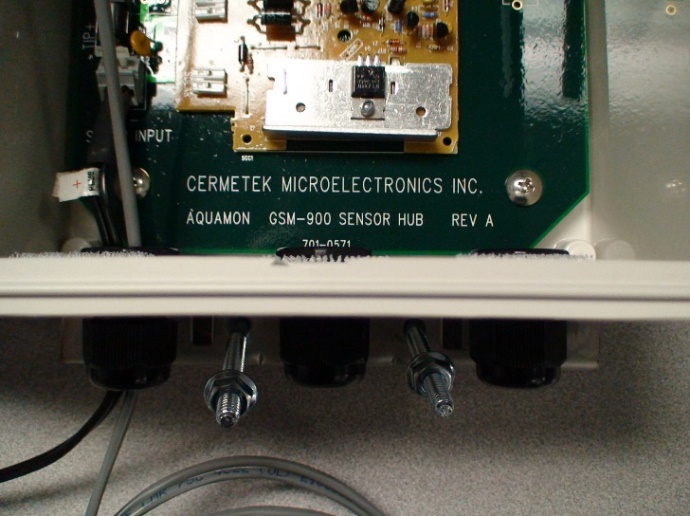
Step; 6: Install the Leaf. With the flexible arm in place it is time to install the selected leaf into the leaf dome. The selected leaf must be carefully installed to avoid damage to leaf or; stem. The first step is to separate the top and bottom plates in the leaf dome this opens the nylon mesh. Next, set the leaf on the bottom plate and the reattach the top plate trapping the leaf in the mesh formed by the two plates. Adjust the flexible arm as required to remove any strain on the leaf or its stem. Step 7: Data Cable Attachment. The data cable passes through the bendable arm and is terminated with an RS485 jack. The RS485 jack plugs into the RS485 connector on the RS485 to RS232 adapter provided with the LeafMon. The Adapter then plugs into the 9-pin RS232 jack in the AquaMon Node. Step 8 (OPTIONAL): Moving the LeafMon Instrument. If the grower elects, or if it becomes necessary, to move the LeafMon Instrument to a different leaf - or to a; new plant - during the growing season, Cermetek recommends either selecting a leaf on the same side of the tree (as the original leaf) or selecting a new plant close to original plant and selecting a leaf on the same side of the tree (as the original leaf). This way the new leaf receives approximately the same sunlight as the original leaf and consistent CWSI results can be obtained. After moving the LeafMon Instrument, new CWSI values will not be available until a new irrigation cycle begins. The new irrigation cycle permits establishment of new reference values. Attempting to calculate CWSI using reference values from the original installation will result in unreliable and inconsistent CWSI values. NOTE When repositioning the LeafMon Instrument to a new leaf during the growing season, care must be taken to replicate as closely as possible the growing environment of the original leaf. This is necessary to maintain consistency in calculate CWSI values. IN GROUND MOISTURE AND IN-LINE WATER/IRRIGATION INSTALLATION PROCEDURE The End User should install the In Ground and In-Line Water/Irrigation per the manufactures' instructions BEFORE electrically connecting the Battery and Solar Panel. Figure 8A illustrates the connection of two In-Line Water/Irrigation Sensors to the sensor board in the AquaMon Base Station. The connection for a Decagon GS1 Soil Moisture Sensor to the CHA50006XBSx AquaMon Base Station is shown in the illustration Figure 8B. It is necessary to connect all sensors to the AquaMon Base Station unit PRIOR to connecting power to the AquaMon Base Station. Follow Steps 9-12 to perform the required electrical connections. 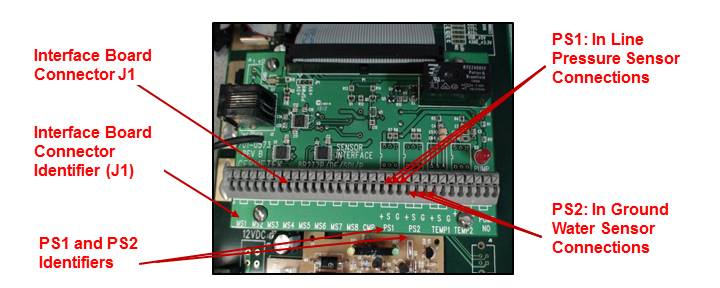 Figure 8A: CHA50006XBSx AquaMon Base Station Sensor Interface Board, Connector J1 and connection locations for In Line Pressure; Sensor (PS1) and In Ground Water Sensor (PS2)
NOTE Although acceptable to connect both an In Ground Moisture Sensor and an In Line Water Pressure Sensor, the LeafMon System only requires the installation of one of these sensors to perform optimally. Step 9: Connect In Ground Moisture Sensor. Connect the Decagon GS1 Ground Moisture Sensor Cable to the Interface Board Connector J1 at location PS2. Connect the individual wires as indicated below. See Figures 8B.
Step 10: Connect In Line Water Pressure Sensor. Connect In Line Water Pressure Sensor Cable to the Interface Board Connector J1 at location PS1. Connect the individual wires as indicated below. See Figures 8A.
OPTIONAL SENSOR ELECTRICAL INSTALLATION PROCEDURE Figure 8A shows the CHA50006XBSx Sensor Interface board. As well as providing connections for the soil moisture and water pressure sensors, the Sensor Interface board also contains connections for FUTURE additions of sensors. BATTERY ELECTRICAL INSTALLATION PROCEDURE Step 11: Connect the Battery Cable to Connector J1 (labeled TIP+) on the Mother Board BEFORE connecting the battery cable to the battery. See Figure 9A below. Note that the Battery Cable has POSITIVE TIP voltage.
SAFETY WARNING Connect the Battery Cable to Connector J1 on the Mother Board PRIOR to connecting the Battery Cable to the Terminals of the Battery. Failure to follow this precaution may cause damage to the Sensor I/O Board, may damage the Base Station Mother Board and/or may cause injury to personnel performing this installation. Step 12: Connect Battery Cable to Battery as indicated below. See Figure 9B.
The supplied battery cable is of sufficient length that the battery - once connected to the AquaMon PCB - can be placed on top of the AquaMon enclosure so as to provide unimpeded access to the Solar Panel connectors. The battery can then be placed into the battery area of the AquaMon enclosure AFTER the Solar Panel connection has been completed. BASE STATION SOLAR PANEL ELECTRICAL INSTALLATION PROCEDURE Step 13: Connect the Solar Panel to the Base Station by guiding the Solar Panel cable thru the 1st (i.e., Left most) gland. See Figure 9A. Connect the Solar Panel cable to Connector J2 (labeled Solar Input) on the Mother Board. See figure 9B.
Figure 10A and 10B. CHA50006XBSx Base Station and Solar Panel with mounting hardware visible. WARNING Ensure that the POSITIVE (+) Terminal of the Solar Panel is connected to the POSITIVE (+) position on the Mother Board and that the NEGATIVE (-) Terminal of the Solar Panel is connected to the NEGATIVE (-) position on the Mother Board. Failure to do this may damage the Base Station Mother Board and void the warranty.
INSTALLATION NOTE As delivered from the factory, NO ADDITIONAL ELECTRICAL CONNECTIONS TO THE SENSOR INTERFACE BOARD ARE REQUIRED FOR PROPER OPERATION OF THE STANDARD CHA50006XBSx SYSTEM. Step 14:; Mount Battery on Velcro tape located on inside bottom of Base; Station Enclosure. Step 15:; Close and secure the Base Station enclosure cover. RSVP; Software Installation Follow the step-by-step procedure below to access the RSVP Web site. Step 16: Login to the Internet using User supplied Internet provider (ISP). Step 17: Access any commercially available web browser. Step 18: Type the following in the Web; browser URL window: http//: www.aquamonrsvp.com Step 19: Type the Cermetek supplied USERNAME and PASSWORD in the Web Site LOGIN screen (see Figure 10), when displayed. USING THE RSVP DISPLAY SOFTWARE Refer to Cermetek document 607-1100, RSVP Software User's Introduction Guide, for a Power Point? tutorial containing instructions and examples for use of the RSVP software. ADDITIONAL SOFTWARE TUTORIALS Cermetek document 607-1102, Moisture Sensor Demonstration, contains an MS Power Point? tutorial highlighting the data available from connected moisture sensors and provides examples for display of the collected moisture sensor data using Cermetek's RSVP web site. INDEMNIFICATION CLAUSE The purchaser/installer/user of the Cermetek CHA50006XBSx, LeafMon Crop Management System containing a CDMA RF Cell Radio, Solar Panel, LeafMon Instrument and various ancillary sensors product and the RSVP Web Site agrees to indemnify, defend, and hold harmless Cermetek Microelectronics, INC, it affiliates and their respective owners, investors, contractors, officers, directors, members, managers, partners, shareholders, licensors, suppliers, customers, employees, agents, third-party advertisers, technology providers and service providers from and against any loss, damage, cost, or liability (including reasonable attorneys' fees) resulting from or relating in any way to a third-party claim, demand, action or proceeding that arises out of the installation or use of CHA50006XBSx product, including but not limited to in relation to your use, non-use or misuse of, or connection to the CHA50006XBSx product, the RSVP Software Services and any Content (including without limitation your Content and any third party Content) forming part of the RSVP site.; |